How to fit a curtain pole
To begin you would require:
- Curtain pole with all the additional fittings such as brackets and finials
- Curtains
- Pencil or a marker
- Rawl Plugs
- Hammer
- Screwdriver
- Screws
STEP 1. HOW HIGH DO YOU WANT THE POLE TO BE?
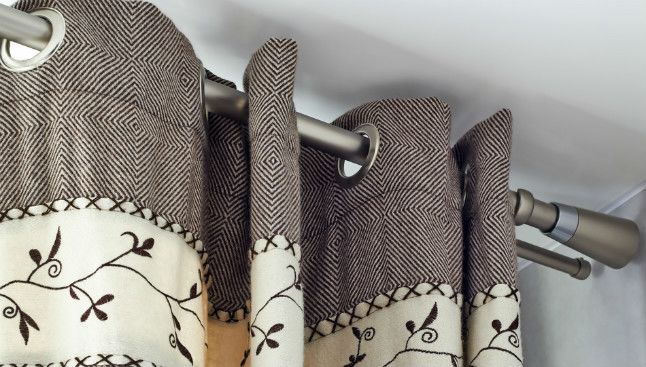
The first step is to make sure we hang the pole at the correct height to make sure our curtains hang at the right size. Whilst some of our customers hang the curtains full length, some hang the curtains to hang just past the window sill. You can even have the curtains resting on the window sill if you have a radiator underneath your window, however that is your choice. Once decided measure approximately 15-20cm above the window in different places and make sure it is a straight measure using a balance. We usually recommend hanging the curtains slightly above the window just so you can block out additional light that can come through the top of the curtain when drawn. One thing to remember is whether you are hanging up eyelet curtains or pencil pleat curtains. Pencil pleat curtains will hang from the bottom of the ring of the pole, so it is best to measure from the bottom of the pole to where you would like it to finish. Eyelet curtains will rest approximately 4cm above the pole, so keep that in mind when measuring the drop for your pole.
STEP 2. HOW WIDE DO YOU WANT THE POLE TO BE?
For the width of the pole, you will want to have the pole hanging approximately 15-20cm wider than the window on either size. This allows the curtains to drape past the window and be tied back to allow for the maximum amount of light to enter whist the curtains are not pulled across.
STEP 3. HANGING THE POLE.
Most poles will come with three brackets that need to be fixed to your wall. You will want two on either end and one bracket as a support in the middle of the pole. When ready, measure 2 inches from the top of the frame on your window at both ends. These will act as markers for where the base of the brackets will rest. Next grab your bracket and hold it so that the bottom is resting perfectly straight and mark the wall at the top of the bracket and the screw holes in the bracket. This will show you exactly where the brackets will rest and show you where the screws will need to go. Once you have done this for all your brackets, simply get your drill and drill the points marked where the screw holes are. If you are hanging the pole onto wood you can generally get away with just using a screwdriver. If you are using the drill make sure you the drill bit you are using is smaller than the rawl plugs so they do not come out. Once all holes are drilled, place your rawl plugs into the holes. Hopefully you should be able to just push them in by hand, however a hammer can be useful just to knock them into place. To finish hanging the brackets simply hold the bracket in one hand against the wall where the screw holes are and begin using the screwdriver with a screw to lock the brackets into position. Before you fully tighten the screws, use a balance to make sure the brackets are resting perfectly straight.
STEP 4: HANGING THE CURTAINS.
To finish, you need to hang up your curtains. For a pencil pleat curtain you can rest the pole on to the brackets and lock the brackets to the pole using the small screws attached to them. It is then a matter of gathering your curtains and hanging them to the bottom of the rings using curtain hooks. For eyelet curtains you need to put your curtains on the pole first and then rest the pole on to the brackets and then lock it in to place. We generally recommend that at least one ring or eyelet needs to go past the final bracket on either side. The reasoning behind this is to allow your curtains to stay in position at one end, so when you close your curtains they do not just come all into the middle of your window. Congratulations you have just hung up a pole!